
The herringbone stitch
is great if you want to use a assortment of beads. You can easily transition into a new row too. If you are making a bracelet you can add
dimension and shape just by using different beads for each row. Your bracelet will
still lay flat too.
Start by waxing and stretching your thread. Tie in a “stopper” bead, leaving about a 8-10” tail and begin at step #1.
Start by waxing and stretching your thread. Tie in a “stopper” bead, leaving about a 8-10” tail and begin at step #1.
 |
Row 1 & 2a. Pick up 4 Seed
beads, go with thread forward through all 4 beads again and stack the beads
as shown.
|
 |
Row 1 & 2b. Pick up 2
seed beads, go with thread down through the 3rd and 4th beads added in the
last step and up through the 2 beads added in this step.
|
 |
Row 1 & 2c . Pick up 2
seed beads, go with thread up through the 2 beads added in the last step and down
through the 2 beads added in this step.
|
 |
Row 1 & 2d . Continue
to repeat steps #2 and 3 until you reach the width that you want your piece
to be. Go with working thread up through the bottom bead on the left and then
up through the top bead on the right as shown.
|
 |
Row 3a. Pick up 2 seed
beads, go with thread down through the next seed bead in Row 2 and then up
through the next seed bead in Row 2, as shown.
|
 |
Row 3b. Continue repeating
Row 3a, stopping before you reach the last set of 2 beads.
|
 |
Row 3c. Pick up 2 beads, go with thread down through the 1st bead
added in Row 2, up through the 2nd bead in Row 2 and up through the 2nd bead
added in this step.
|
 |
Row 4a. Pick up 2 seed beads, go with thread down
through the next seed bead in Row 3 and then up through the next seed bead in
Row 3, as shown.
|
 |
Row 4b. Continue repeating Row 4a, stopping before
you reach the last set of 2 beads.
|
 |
Row 4c. Pick up 2 beads, go with thread down through
the 1st bead added in Row 3, up through the 2nd bead in Row 3 and up through
the 2nd bead added in this step.
|
 |
Row 5a. Pick up 2 seed
beads, go with thread down through the next seed bead in Row 2 and then up
through the next seed bead in Row 2, as shown.
|
 |
Row 5b. Continue repeating Row 5a, stopping before
you reach the last set of 2 beads.
Row 5c. Pick up 2 beads,
go with thread down through the 1st bead added in Row 4, up through the 2nd
bead in Row 4 and up through the 2nd bead added in this step.
|
 |
Continue making as many rows as you would like to finish your piece. Following Rows 4 and 5. |
 |
When you have reached the
final row of your piece, take your working thread and go down and up through
beads as shown in the illustration. This finishes off your final row nicely..
Sandra D. Halpenny © 2014
All rights reserved
These instruction may not be copied or distributed in any way without the express written permission of the author. |
More Bead Weaving Patterns - Home

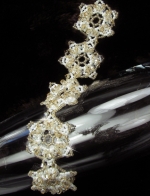 Night Sparkle Bracelet Pattern